
Federated ID
This guide explains how to log in using your own (third party) federated identity provider (IdP) with our platform. The following sections detail the configuration process and setup requirements.
Federated IdP
We support SAML 2.0 federated flow, and also support Google as a “social” provider. This documentation currently covers our supported identity providers. If you’re interested in using a different identity provider that isn’t currently documented, please contact support@modicagroup.com to discuss implementation options.
Before You Begin
Before you begin configuring an Identity Provider for your account
-
Your organisations account will need to be enabled for federated login.
-
To configure things you will need to ensure you have the correct permissions associated with the user account you have with us. Your Service Delivery or Account Manager can confirm this if needs be.
-
You will need to have the appropriate access level to your organisations Identity Provider in order to configure the federated connection.
-
Make sure you have configured a user account in your identity provider that maps to the corresponding user account at our end. The assertions for the user account we expect to be mapped from the identity provider are:
-
firstName
-
lastName
-
email (this may also need to be mapped to ‘principaID’ or similar IdP attribute denoting the username used for logging into our messaging platform)
-
Note: the assertion names are case sensitive and need to be entered as firstName, lastName and email. Incorrect case will cause the federated login to fail.
Configure the Account
Navigate to Settings
To start the configuration process:
-
Login to the messaging platform with the appropriate user account.
-
Navigate to Client then Settings in the side menu
-
Then click Login Settings
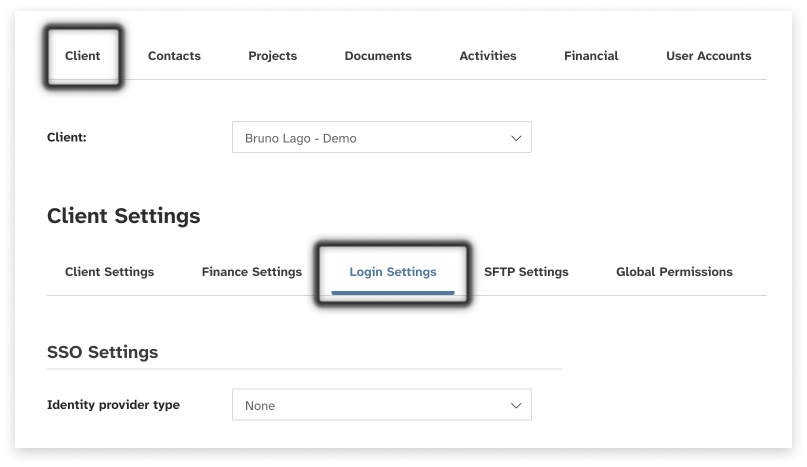
Login Settings
On the Login Settings page, locate the Identity Provider dropdown:
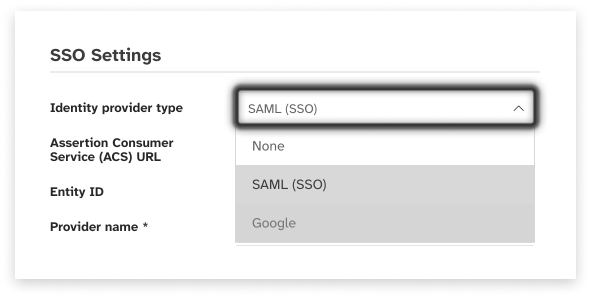
From the dropdown options, select the required Identity Provider. This will load the appropriate settings forms as detailed in the sections below.
Set up SAML IdP
Process:
-
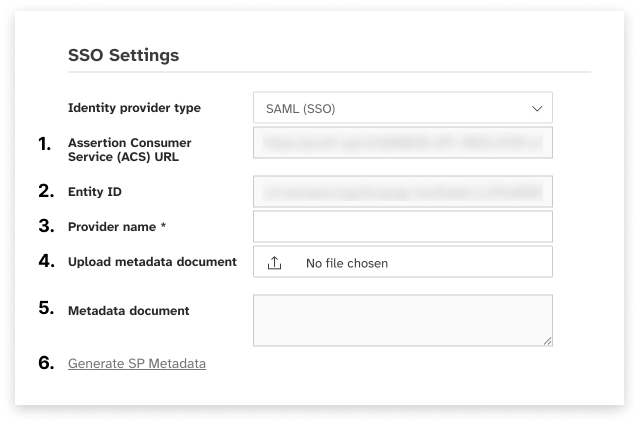
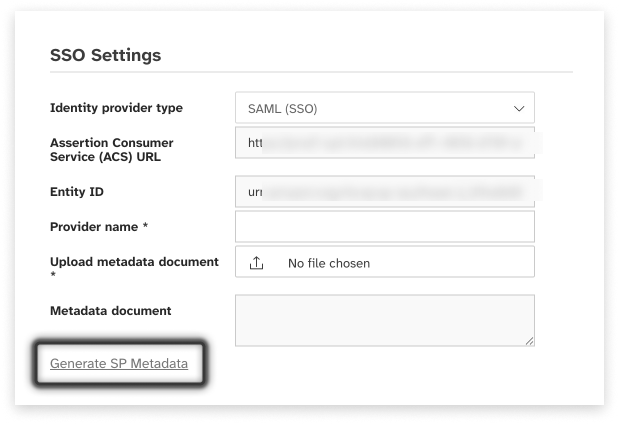
The Assertion Consumer Service (ACS) URL field displays the URL the identity provider will redirect to. This is a read only field.
-
The Entity ID value is used by the identity provider. This is a read only field.
-
Enter a name for the identity provider (example: JumpCloud-OMNI).
-
The identity provider will be able to generate an XML metadata document for importing by the service provider. Use this to open a file picking window and select the XML file.
-
The content of the uploaded XML file will display here. This is a read only field.
-
The identity provider can import the service provider settings from an XML metadata document. This document will include the ACS URL, entity ID and user account attributes. Click here to generate this document.
Note: The user account attributes that the messaging platform expects to be mapped from the identity provider are -
- firstName
- lastName
- email (this may also need to be mapped to ‘principalID’ or similar IdP attribute denoting the username used for logging into the messaging platform)
Click the Update button at the bottom of the page to set the identity provider settings for this client account
Set up Google IdP
To add a social identity provider, you first create a developer account with the identity provider. After you have your developer account, register your app with the identity provider. The identity provider creates an app ID and an app secret for your app, and you configure those values in your messaging platform account. See here for additional information to get you started with Google - https://developers.google.com/identity/
Process:
-
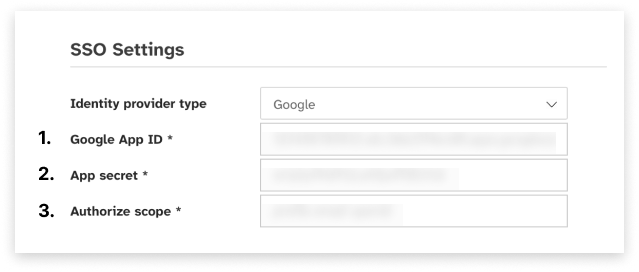
Enter the Google App ID that you received when you created your client app.
-
Enter the App secret that you received when you created your client app.
-
Enter the names of the social identity provider scopes that you want to map to user pool attributes. Scopes define which user attributes, such as name and email, you want to access with your app.
Note: The user account attributes that the messaging platform expects to be mapped from the identity provider are -
- firstName
- lastName
- email (this may also need to be mapped to ‘principalID’ or similar IdP attribute denoting the username used for logging into OMNI)
Click the Update button at the bottom of the page to set the identity provider settings for this client account.
Legacy “SSO” settings
Legacy SSO settings are only applicable for clients using version 1.0 of the federate identity solution. New federated clients should not be using this option, and will not see a legacy option in the Provider Type dropdown. Legacy clients will be able to update the IdP URL if required, and generate / download the Service Provider XML metadata file.
-
Click the Generate SP Metadata link to generate the client specific metadata for use with your IdP
-
Enter the URL for the client IdP. This will take the form of something like this:
https://myapps.myidp.com/signin/bunch_of_numbers_and_letters?tenantId=bunch_of_numbers_and_letters -
Don’t worry about the 2 tick boxes.
Enable Federated ID
Part of configuring federation identity is enabling the user accounts to use federation.
-
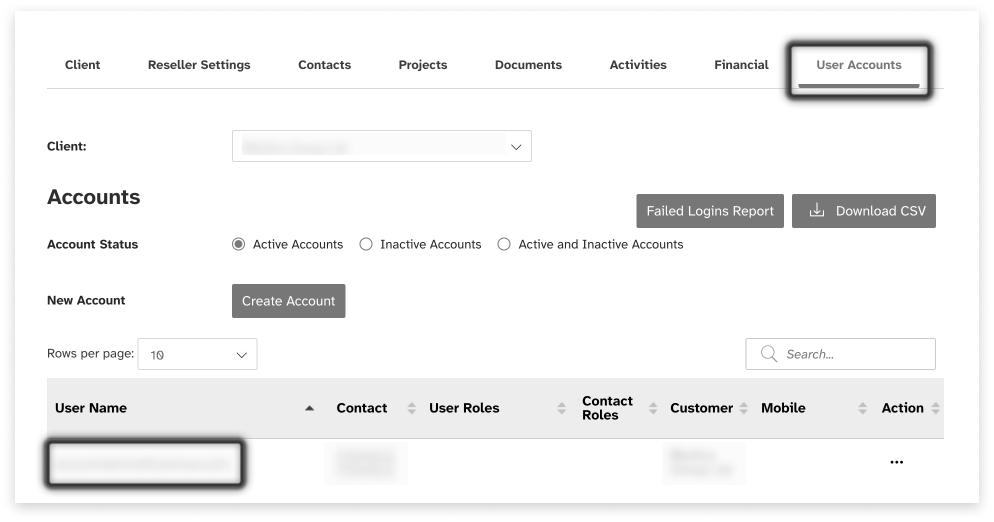
As the user account with the proper permission, go to Clients; User Accounts
-
Click on the User Name you wish to enable. This will open the Contact Details for the user account.
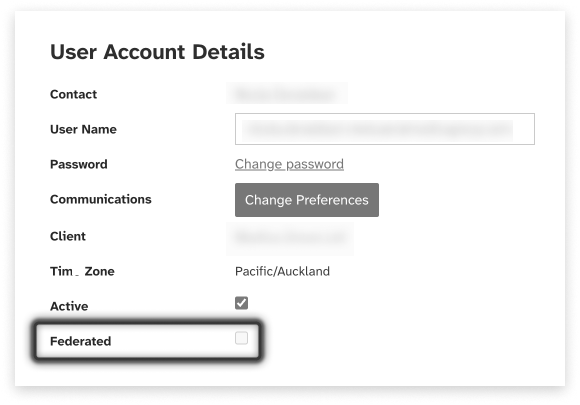
On the Contact Details screen, enable the Federated checkbox as shown. The next time the user logs in to the messaging platform the federated login flow will apply to the user account, and they will be redirected to the identity provider configured for the client account. The user account will continue to use federated identity until this check box is disabled.
Configuring Entra ID
This section provides more information on configuring Entra ID, a popular identity provider for business use.
Before You Begin
Before you configure Entra ID, you should ensure you:
-
Have an Active Directory account
-
Have one of the following roles for Active Directory:
-
Global Administrator
-
Cloud Application Administrator
-
Application Administrator
-
Owner of the service principal
-
-
Have created and assigned a user account in Entra ID that will map to the associated messaging platform user account
-
Have administrator access to the messaging platform client account wishing to use federated identity.
-
Have the Service Provider XML Metadata file for the applicable messaging platform client account. You can generate this from the Client Settings > Login Settings page for the applicable messaging platform account.
-
Have enabled the associated messaging platform user account to use federation login.
Add To Entra ID
-
Sign in to the Microsoft Entra admin centre as at least a Cloud Application Administrator
-
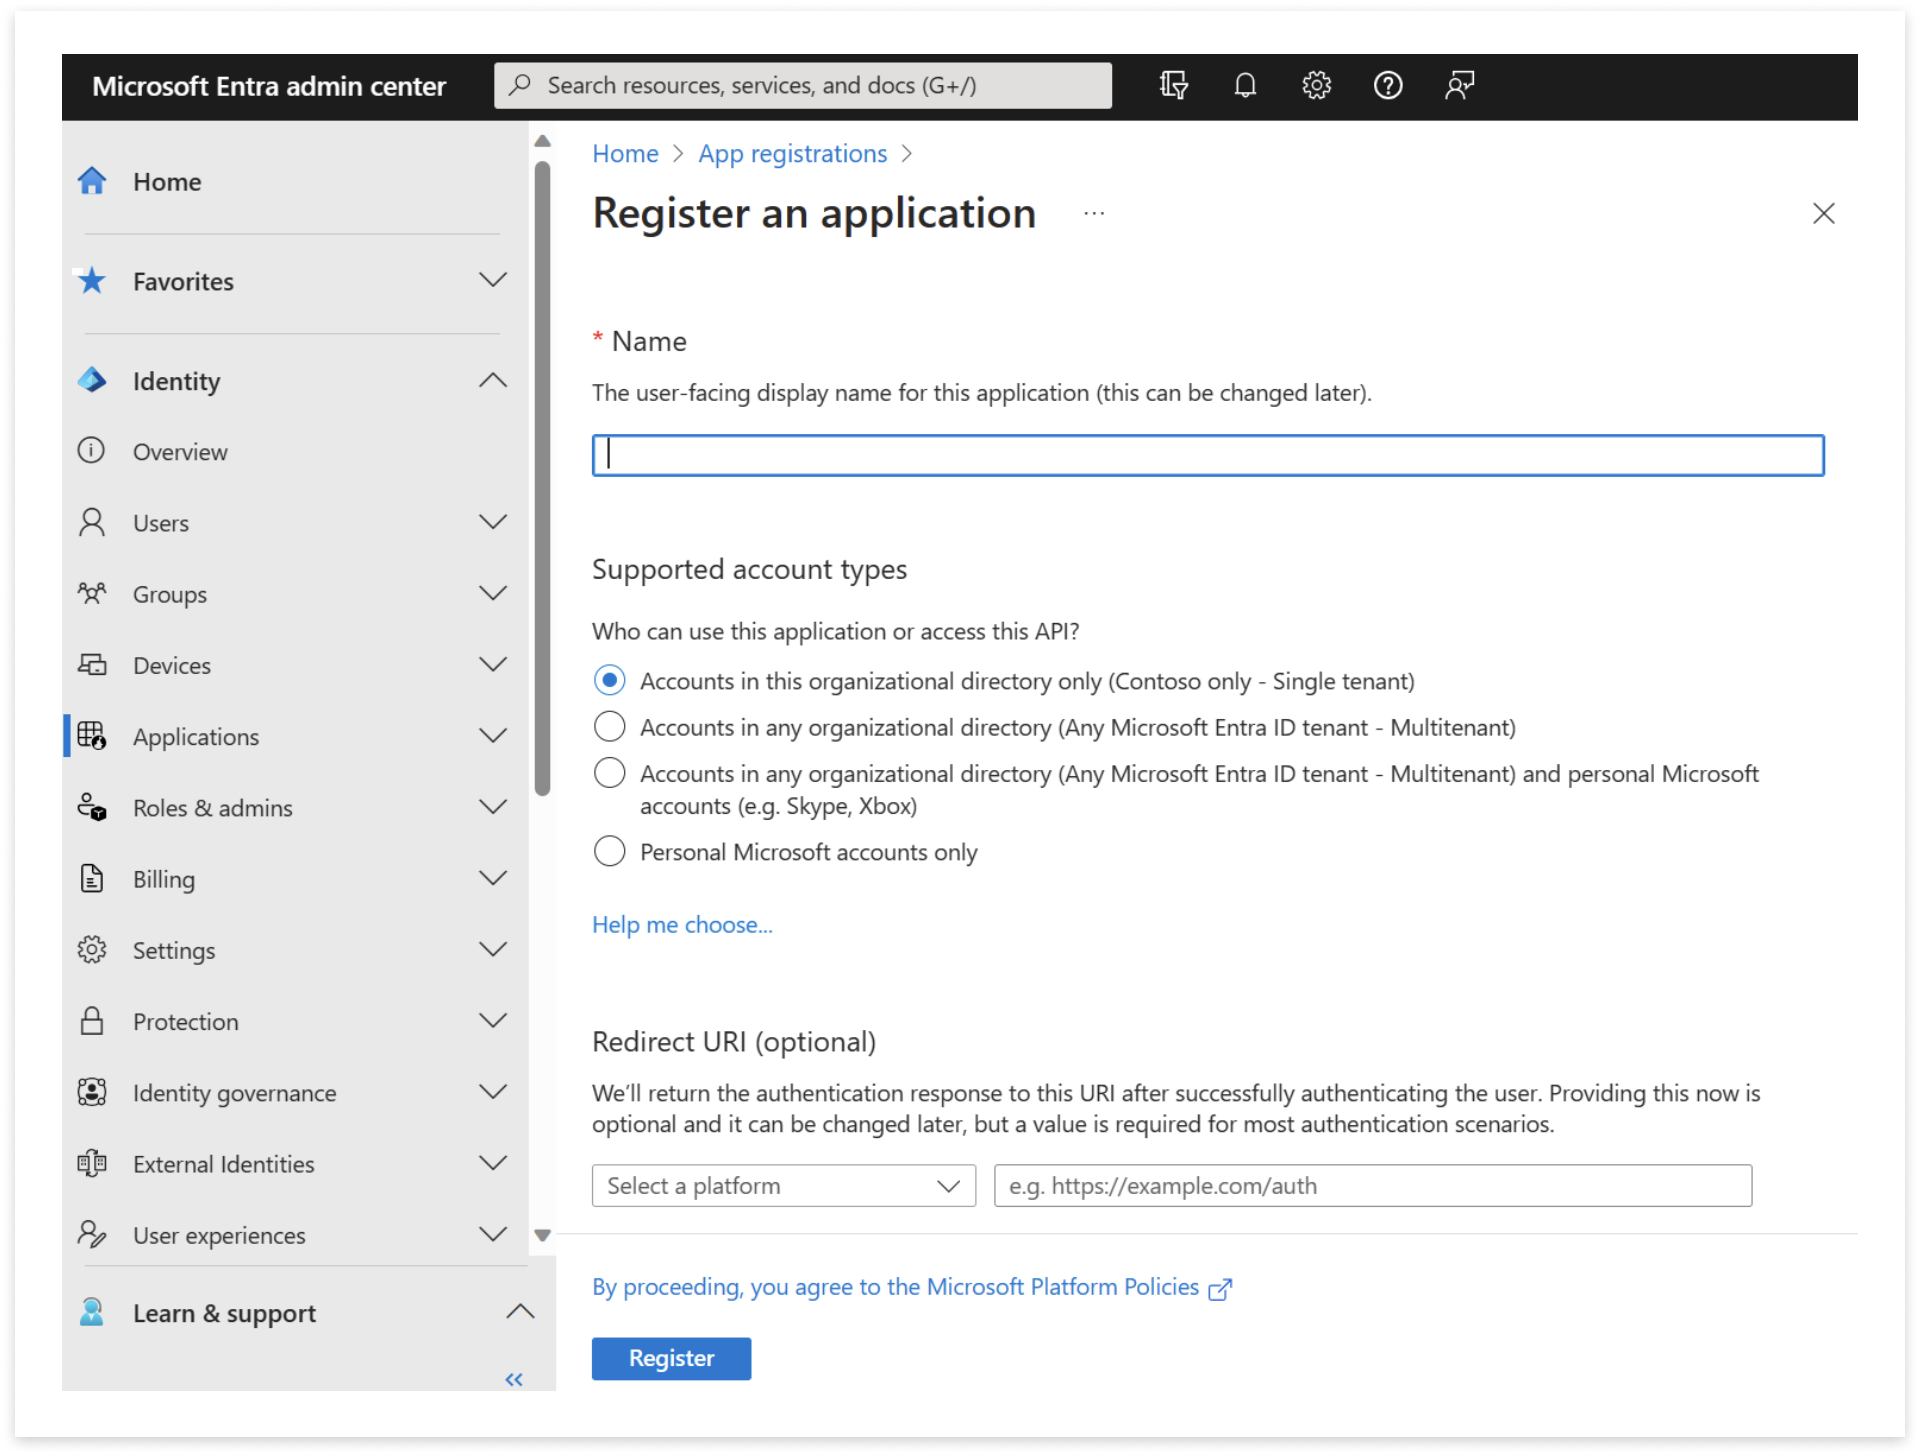
Browse to Identify > Applications > App registrations and select New registration.
-
Enter a Display Name for your Application.
-
Specify who can use the application, sometimes called its sign-in audience.
-
Leave Redirect URI (optional) alone for now as you configure a redirect URI in the next section.
-
Select Register to complete the initial app registration.
Set up Entra ID SSO
-
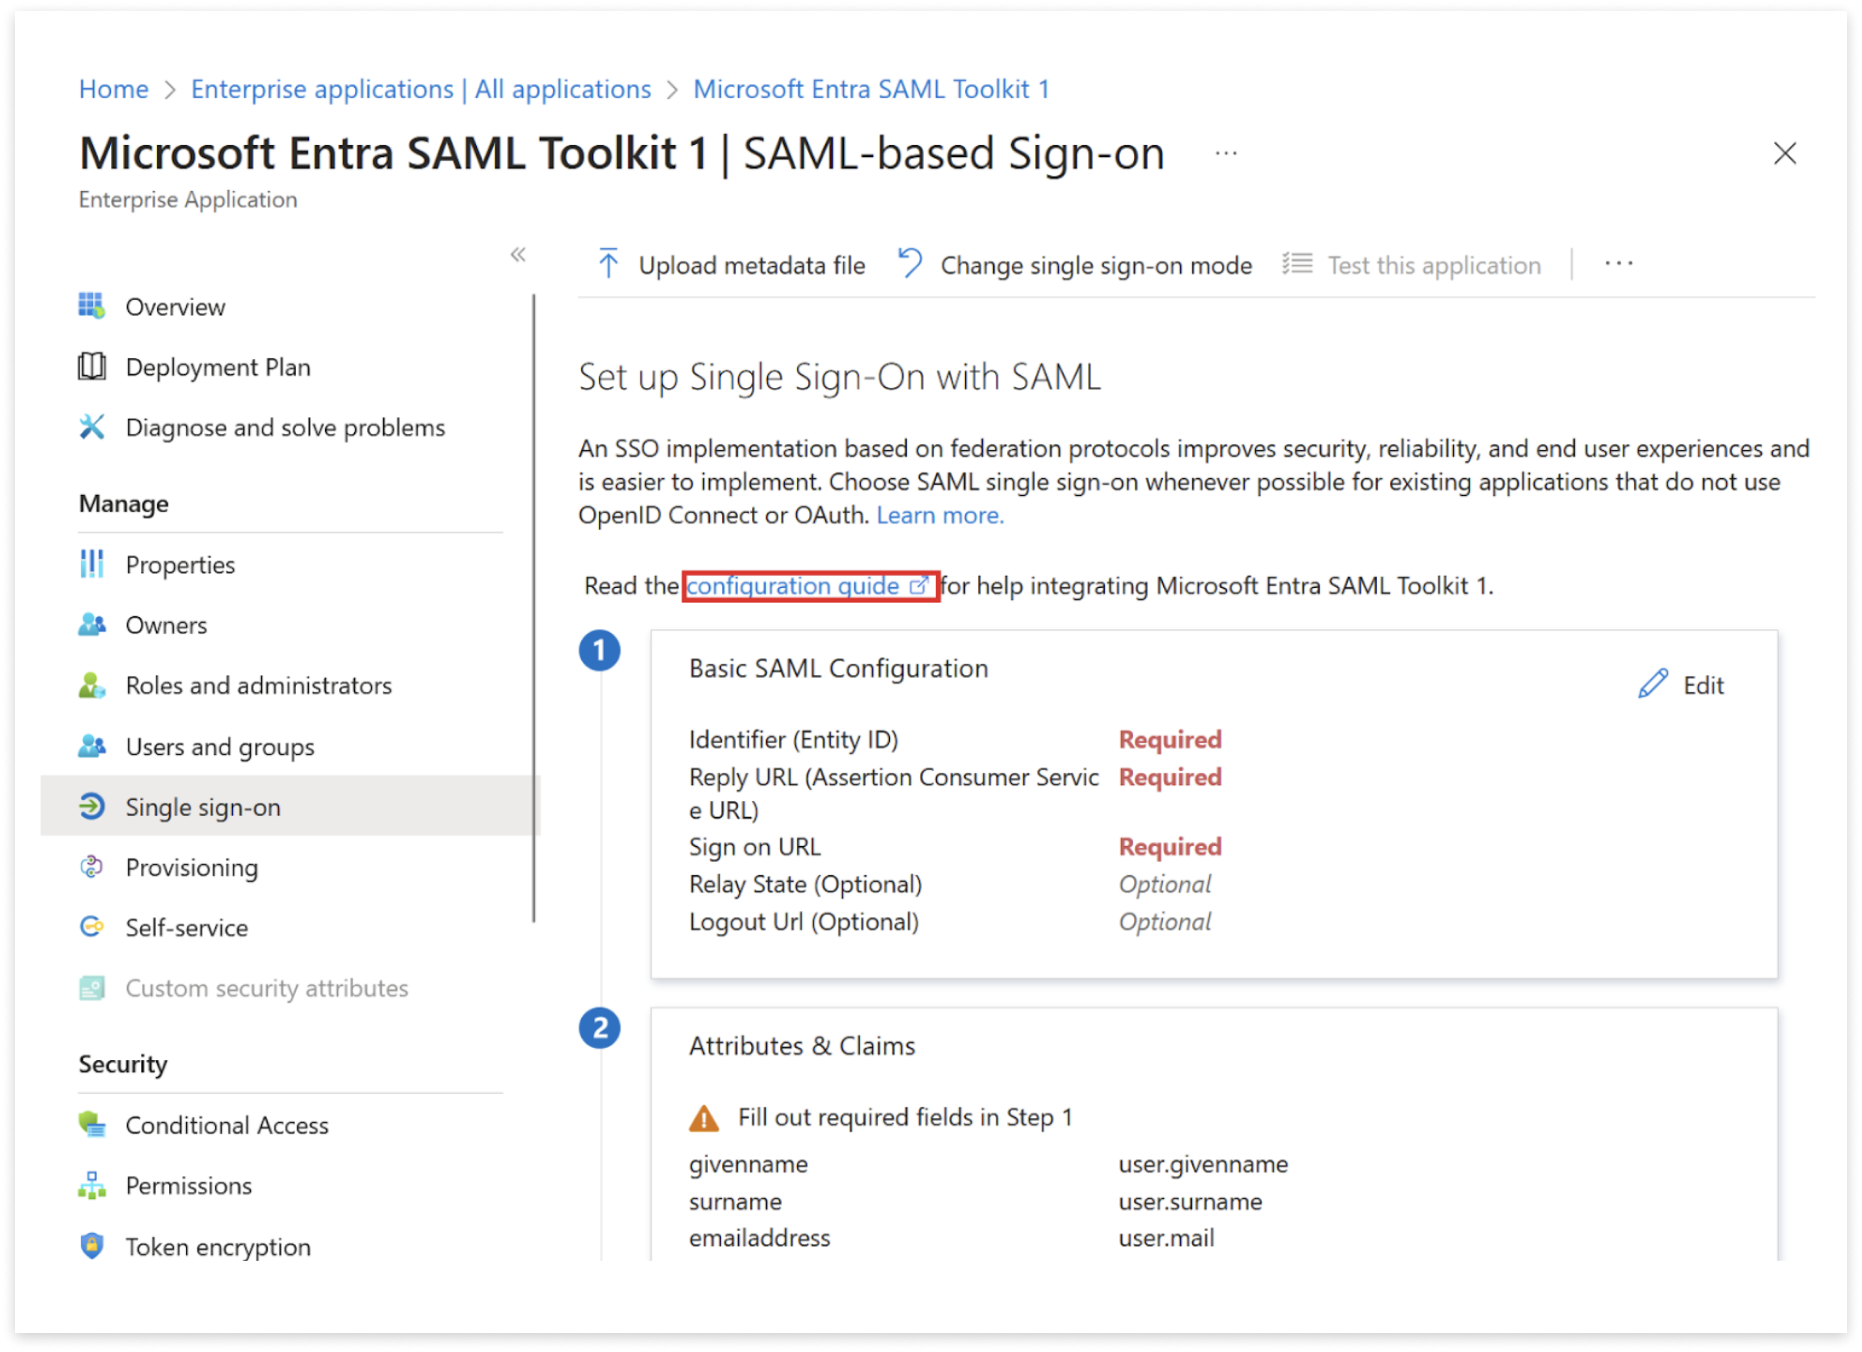
In the Manage section of the left menu, select Single sign-on to open the Single sign on pane for editing.
-
Select SAML to open the SSO configuration page. After the application is configured, users can sign in to it by using their credentials from the Microsoft Entra tenant.
-
Select “Upload metadatafile” option to import the XML file you generate in the application
-
In Basic SAML Configuration the XML will replace the default Identifier ID (Entity ID) with the Identifier (Entity ID).
-
Click ‘Save’.
-
Copy the Sign on URL from the messaging platform page into your Entra ID settings. The Sign on URL will allow your new users to initiate the sign on from IdP side, which in turn will trigger the Just-in-Time (JIT) provisioning in Omni. This is only needed for JIT purposes, existing users can login via the standard platform login page.
Map Attributes and Claims
| Steps | View |
|---|---|
| Navigate to Attributes & Claims | |
| Click on Required Claim Set this to user.principalname | 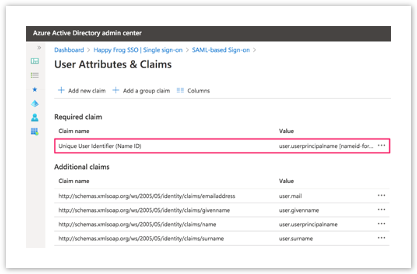 |
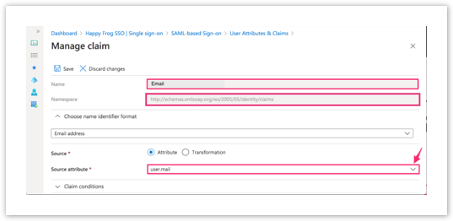
| Click on user.mail Delete the content in Namespace field Change Name to email Ensure Source is set to Attribute when editing the claim |
 |
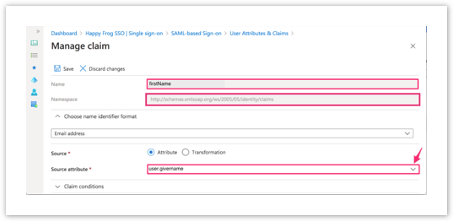
| Click on user.givername Delete content in Namespace field Change Claim name to firstName Ensure Source is set to Attribute when editing the claim |
 |
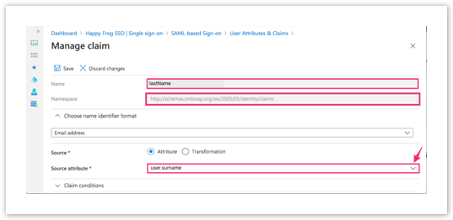
| Click on user.surname Delete content in Namespace field Change Claim name to lastName Ensure Source is set to Attribute when editing the claim |
 |
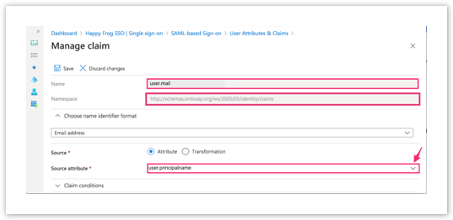
| Click on user.principalname Delete content in Namespace field Change Claim name to user.mail Ensure Source is set to Attribute when editing the claim |
 |
| The result should look like this | 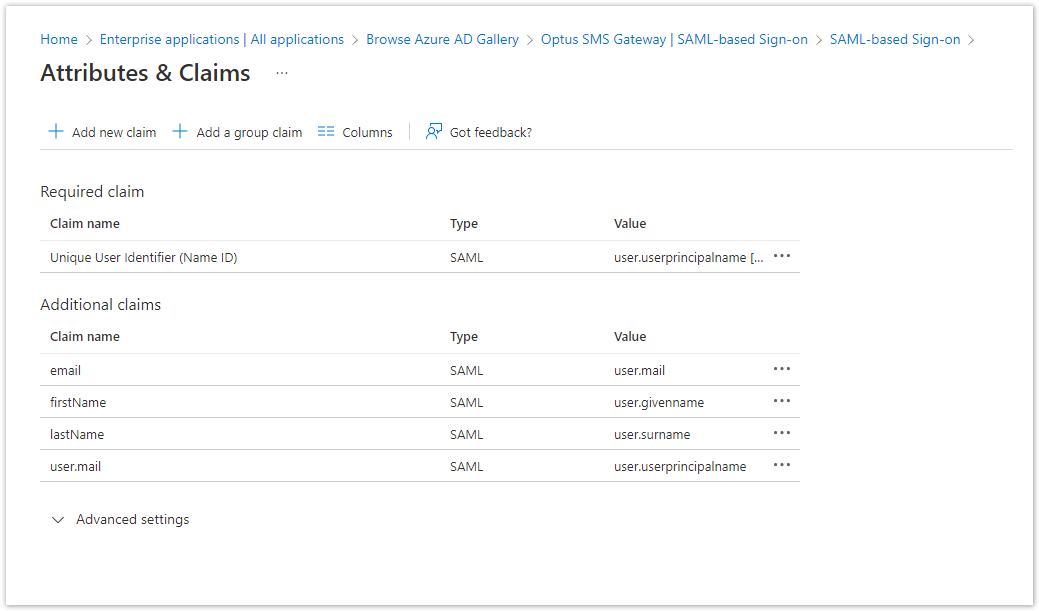 |
FAQ
Glossary of terms
Attribute
Federated identity
Identity Federation, aka “Federation”
Identity Provider, aka "IdP"
Online Platform
Security Assertion Markup Language, aka "SAML"
Single Sign On, aka "SSO"
User
How does Federated ID work?
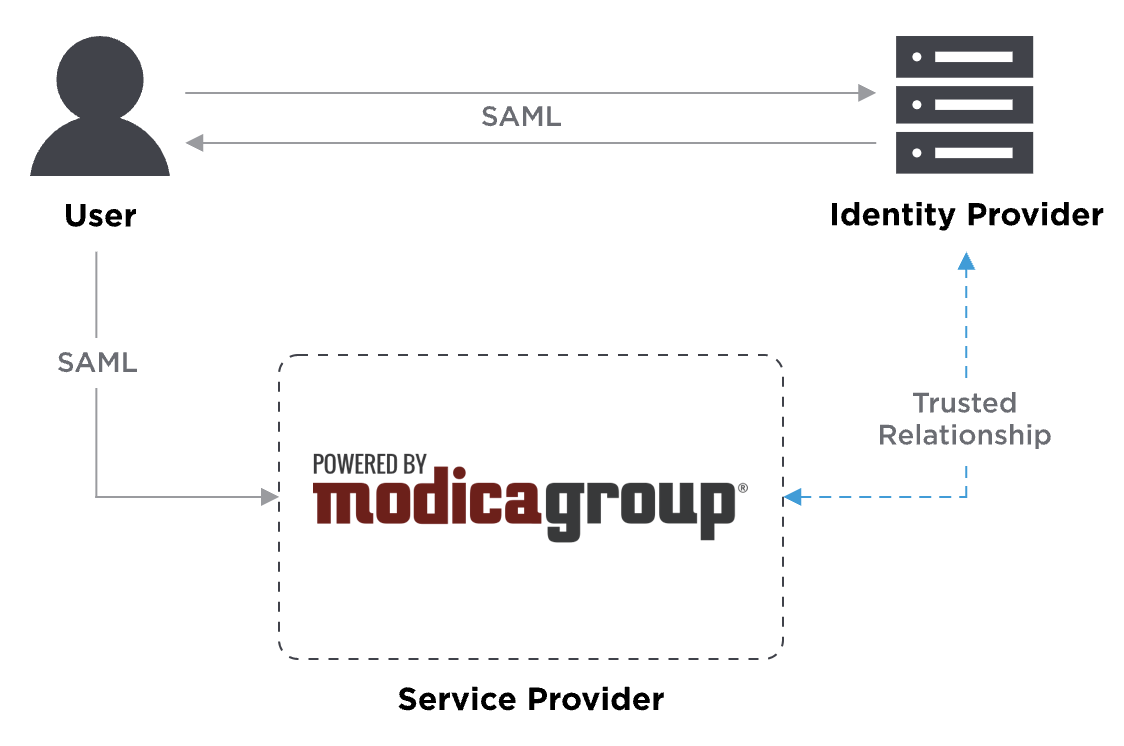
Federated ID uses a SAML claims-based authentication workflow. First, when a user tries to access the messaging platform, the platform will ask the identity provider to authenticate the user. Then the platform uses the SAML assertion issued by the identity provider to grant the user access. Here’s an example.
-
The user opens their browser and navigates to the messaging platform login page, and enters their Username. The Username belongs to a client that has been configured to use an identity provider for authentication.
-
The messaging platform recognises the Username provided belongs to a federated ID client and responds with a SAML request.
-
The browser passes the SAML request to the identity provider.
-
The identity provider parses the SAML request.
-
The identity provider authenticates the user by prompting for a username and password or some other authentication factor. NOTE: The identity provider will skip this step if the user is already authenticated.
-
The identity provider generates the SAML response and returns it to the user’s browser.
-
The browser sends the generated SAML response to the messaging platform which verifies it.
-
If the verification succeeds, the platform grants the user access to their platform dashboard page
Can I configure Entra ID for federated ID with the platform?
Some other useful tips are here:
Q. Do I need separate Entra ID applications for each messaging platform user?
A. In the messaging platform, each client is a separate entity with a unique ID. This unique ID maps to the entity ID in the Entra ID application, and ensures the user account is authenticated against the correct platform client, allowing each user to access the correct applications under their profile. Using the incorrect client ID will prevent the user account from accessing applications.
Q. I’ve configured Entra ID but after authenticating with the platform I receive a user access error.
A. This will happen with Parent / Child client accounts where the Entra ID application is using the wrong client ID (probably using the Parent ID for a Child account). Ensure you are using the correct data from the metadata file for the relevant messaging platform client account. Each Parent / Child client account needs an Entra ID application / group
Q. I’ve configured Entra ID but when I authenticate with the messaging platform I’m sent back to the login page in a continuous loop.
A. Ensure the User Attribute user.principalname is mapped to user.mail
Q. I’m getting a ‘user access error’ from the messaging platform.
A. If you have configured Entra ID but are getting a user access error after authenticating with the platform it is likely due to the Parent / Child client accounts set up, where the Entra ID application is using the wrong client ID (probably using the Parent ID for a Child account). You can check you are using the correct data from the metadata file for the right messaging platform client account.
Each Parent / Child client account needs its own Entra ID application / group
I'm getting a message from the platform saying I don't have permission to view that page?
I'm getting a message saying "oops, this link isn't working"
.png)
This normally happens when the customer has parent / child accounts and the user account is placed in the incorrect client at the IdP side. To fix this, check the user account is configured correctly.
What other Identity Providers can I use?
Some examples are;
-
Microsoft Entra ID
-
CyberArk
-
JumpCloud
-
Okta
-
OneLogin
-
Ping Identity
You can also use “social” providers that include Google, Facebook, Apple and AWS.
I'm getting an "Oops!" message from the messaging platform on login attempt
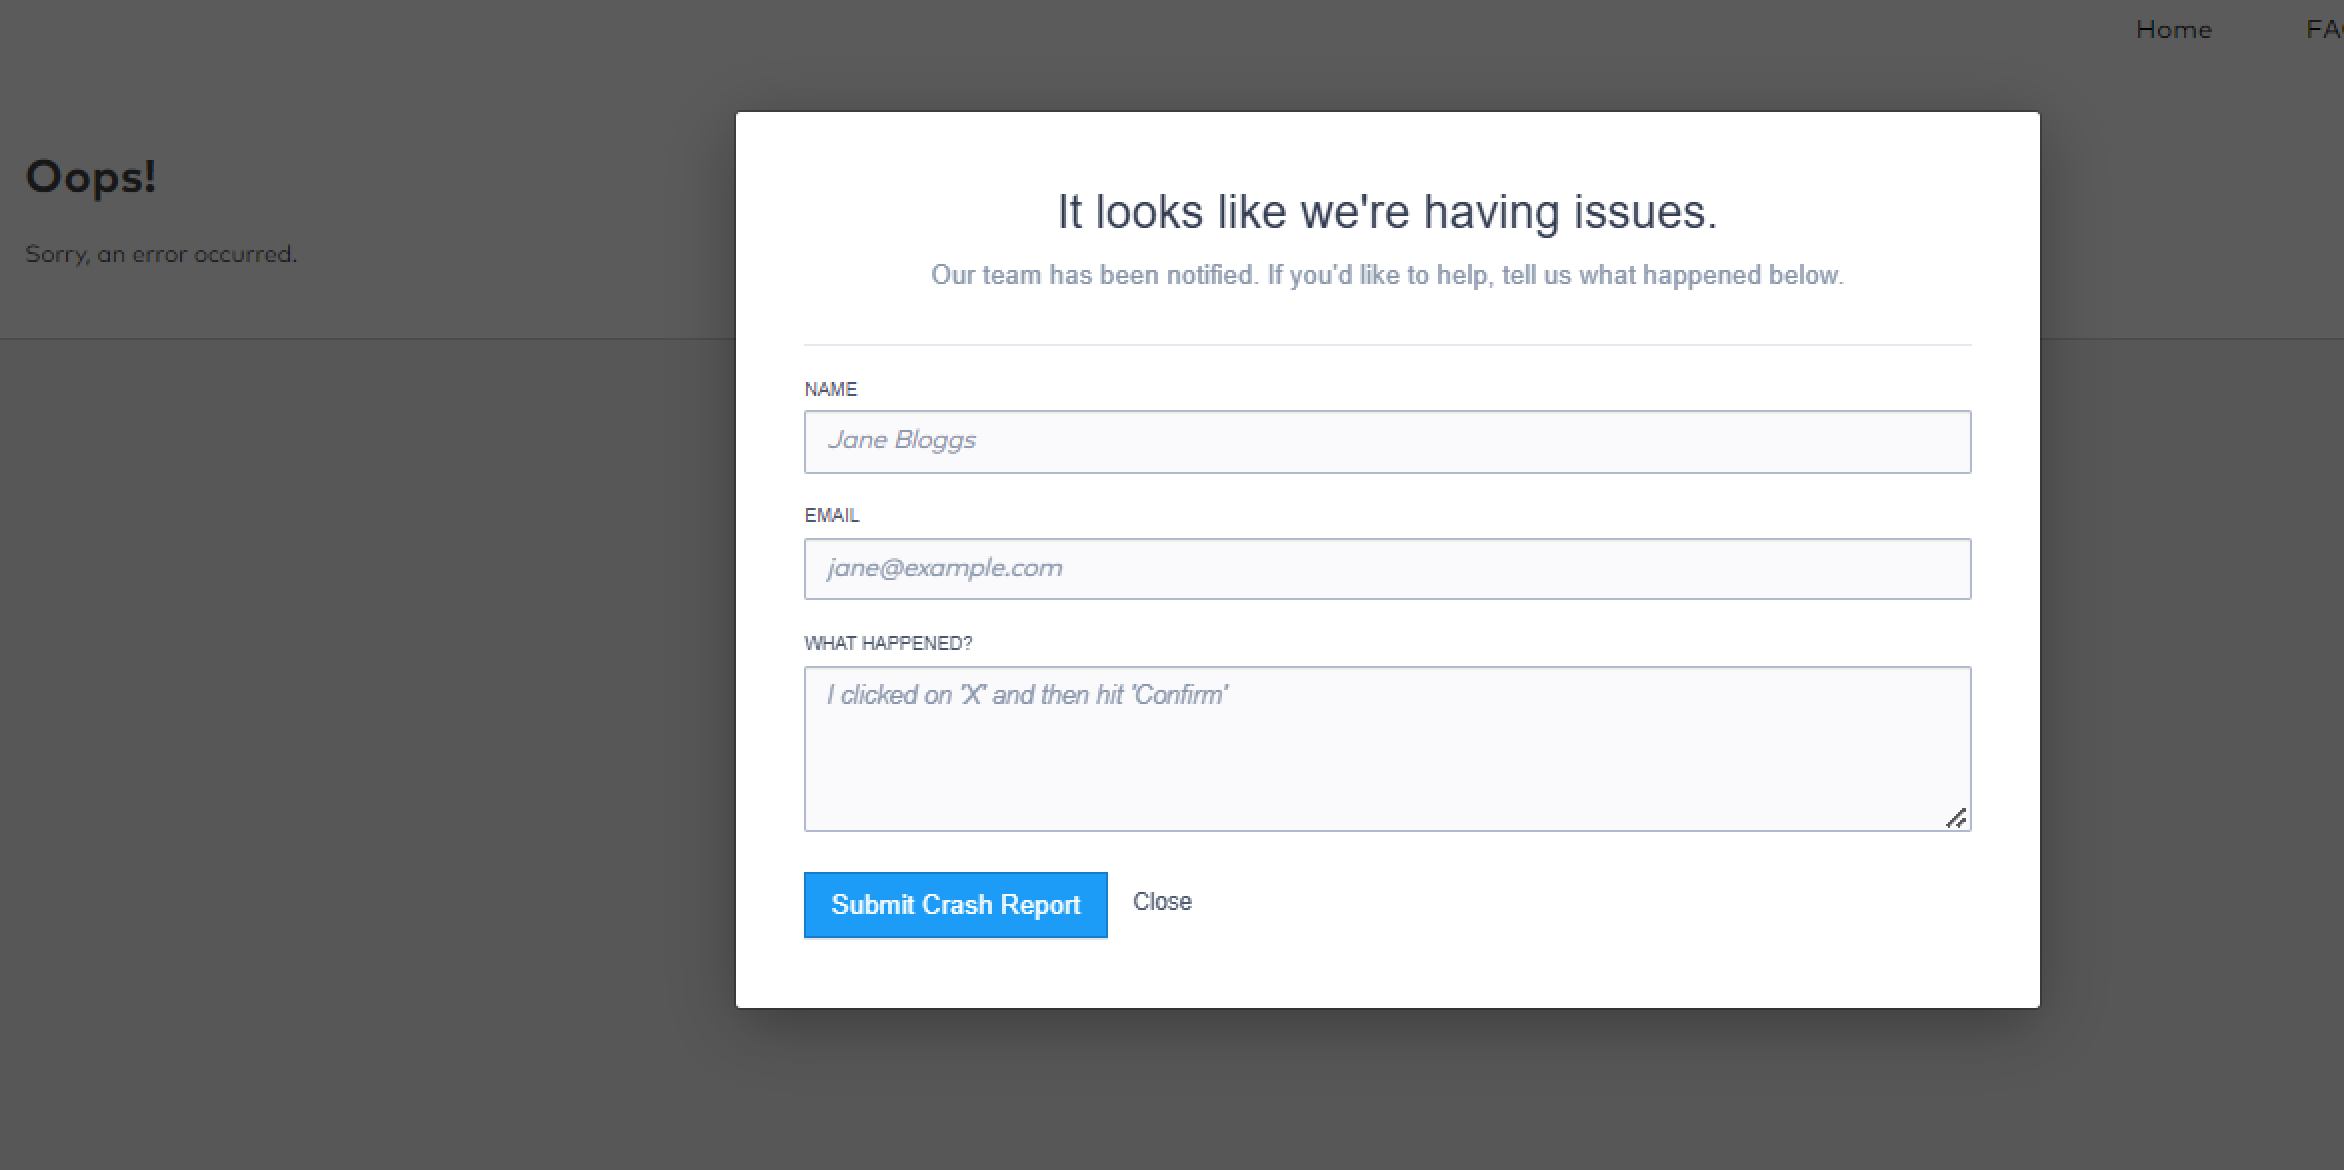
See the user guide for more information on mapping user attributes.